Quick Answer
If your GemCam is not connecting, start by checking the USB-C cable and port, confirming the power indicator light is on, and making sure you are using the supplied cable. Mac users should update the GemIQ app; Windows users should use an updated version of Google Chrome with camera access enabled in browser settings.
Before You Start
Have the USB-C cable that came in the box with your GemCam.
Know whether you are using a Mac or a Windows computer.
Confirm the GemCam is powered on — there should be a green indicator light at the back of the device.
Steps
Check the USB-C Cable and USB C Port
Make sure the USB-C cable is firmly plugged into both the GemCam and your computer.
Disconnect and reconnect the cable to rule out a loose connection.
Confirm the USB-C port on your computer is working.
If your computer has more than one USB-C port, try a different one.
Check the Power Button and Indicator Light
Press the power button on the GemCam to turn it on.
Look for the green indicator light at the back of the device — this confirms the GemCam is powered on and ready to connect.
Use the Supplied USB-C Cable
If you are using a third-party cable, replace it with the USB-C cable that came in the box or ensure that you are using a cable with data transfer capabilities.
Restart Your Computer
Restart your computer.
After restarting, reconnect the GemCam and check whether it is now recognized.
Mac-Specific Steps
Update and Restart the GemIQ App (Mac)
Open the App Store on your Mac and search for GemIQ.
Install any available updates.
To enable automatic updates, go to App Store > Settings and turn on Automatic Updates.
Once updated, restart the GemLightbox app and reconnect the GemCam.
Windows-Specific Steps
Use Google Chrome and Clear the Browser Cache (Windows)
Open Google Chrome and make sure it is updated to the latest version.
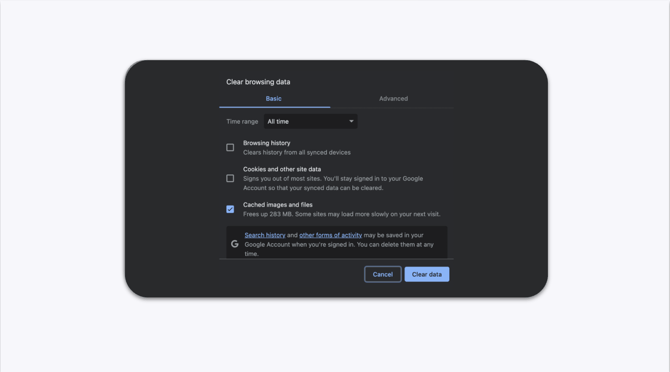
Clear your browser cache: go to Settings > Privacy and Security > Clear Browsing Data.
Refresh the page and reconnect the GemCam.
Enable Camera Access in Chrome (Windows)
In Chrome, go to Settings > Privacy and Security > Site Settings > Camera.
Make sure the site is allowed to access the camera. If it is blocked, change the setting to Allow.

Expected Result
The GemCam is recognized by your computer or browser.
On Mac, the GemIQ app displays the live camera feed. On Windows, Chrome shows the GemCam feed without any permission errors or connection warnings.
If This Does Not Work
-
If the green indicator light is not lit, the GemCam may not be receiving power — try a different USB-C cable or port.
-
Try connecting the GemCam to a different computer to determine whether the issue is with the device or your setup.
-
If the problem persists, contact GemIQ Support with the details listed below.
Common Mistakes
-
Using a third-party USB-C cable that only supports charging, not data transfer.
-
Forgetting to press the power button on the GemCam before connecting.
-
Using a browser other than Google Chrome on Windows.
-
Camera access blocked in Chrome browser settings — this is a common cause of connection failure on Windows.